Hardcoat Stucco Crack Repair Techniques
Hardcoat stucco is built to last, but even well-maintained homes can develop cracks from extreme weather, impact damage, or moisture issues.
When these cracks appear, many homeowners worry they may lead to deeper problems, such as water intrusion, discoloration, or bubbling paint.
Before the damage spreads across the walls, the right Stucco Repair approach helps protect your home and restore a smooth finish.
This guide breaks down practical, real-world techniques for repairing cracks in hardcoat stucco so you can keep your home’s exterior strong and long-lasting.
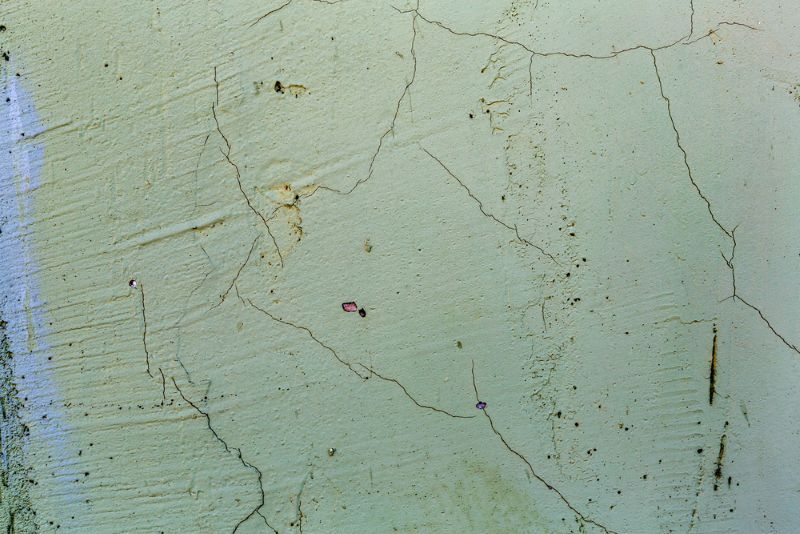
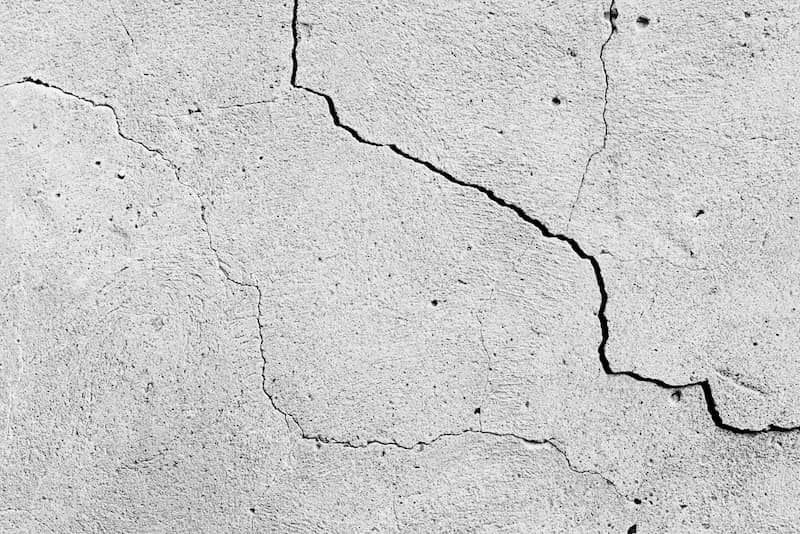
Why Hardcoat Stucco Cracks Form
Cracks often start small, but they’re a sign that your stucco surfaces are reacting to pressure, moisture, or movement. Hairline cracks may result from drying shrinkage, while larger cracks may indicate deeper structural issues.
These early signs often lead homeowners to consider stucco repair before the damage spreads. According to the U.S. Forest Products Laboratory, cement-based materials such as stucco naturally crack when subjected to stress and environmental changes.
Hardcoat stucco is made from portland cement, sand, and lime, so it’s affected by temperature swings, trapped moisture, and extreme weather. When existing stucco faces freezing temperatures, it can expand and contract, weakening the foundation layer.
Impact damage from tools, yard work, or shifting walls can also create sudden breaks. If ignored, these cracks can spread across the entire wall and allow moisture to seep inside, causing deeper surface damage.
Step 1: Inspect the Damaged Area
Before you can repair stucco correctly, you need to understand what caused the problem. Start by checking for:
- Water stains
- Bubbling paint
- Soft or crumbling spots
- Loose material
- Signs of water intrusion
Use a utility knife or a hammer to tap along the crack gently. If pieces fall away easily, the damaged stucco needs more than a surface patch. Look for trapped moisture, especially around windows or areas where moisture issues are common.
If the crack points to structural concerns or deeper stucco issues, it’s best to call a professional before proceeding.
Step 2: Clean and Prepare the Crack
Proper prep work helps your stucco repair last longer. Cleaning ensures the stucco mix will bond well with the surrounding stucco.
- Use a wire brush to remove debris, dirt, and loose pieces.
- Brush along the edges to create a clean groove.
- For small cracks, widen them slightly so the repair material can grab onto the surface.
- Mist the area lightly using a spray bottle to keep the crack damp. Dry stucco absorbs too much water, causing poor adhesion and a weak bond.
Preparation is one of the most important steps in getting a proper, lasting repair.
Step 3: Apply a Stucco Patch for Hairline Cracks
For hairline cracks or minor issues, a simple stucco patch works well. These products are designed for minor repairs and blend into the surrounding surface.
How to apply it:
- Add the patching material using a trowel, pressing it firmly into the crack.
- Smooth out the repaired area to avoid ridges.
- Feather the edges so the finish transitions cleanly into the surrounding stucco.
If you want a seamless look, match the texture carefully. Use a sponge, brush, or trowel technique that resembles the original pattern.
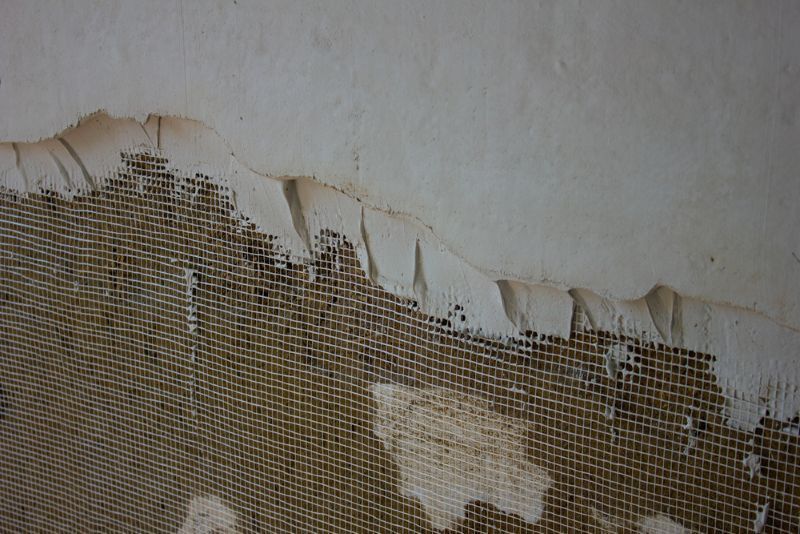
Step 4: Rebuild Layers for Larger Repairs
Hardcoat stucco uses multiple layers: a scratch coat, a brown coat, and a top coat. When the crack is deep or large sections have fallen away, you must recreate these layers for a long-lasting finish. This layered system follows ASTM C926, which provides guidance on proper stucco application and repair practices.
1. Install Metal Lath
If the substrate is exposed, add metal lath to reinforce the area. Secure it so it supports the new stucco.
2. Apply the Scratch Coat
Mix traditional stucco using Portland cement, sand, and water. Avoid using too much water—it weakens the mix.
Apply the scratch coat to fill the recessed area. Score the surface horizontally so the next layer bonds properly.
3. Add the Brown Coat
Once the first layer firms up, apply the brown coat. This layer creates thickness and stability. Make sure the coat is level with the surrounding wall.
4. Apply the Top Coat
The final step is applying the finish coat. Match the texture of your existing stucco surfaces to keep everything uniform. This helps prevent noticeable blending lines.
Be sure to use properly installed materials to avoid future cracking or water damage.
Step 5: Repairing Synthetic Stucco (EIFS)
While hardcoat and synthetic stucco look similar, their repair methods differ. Synthetic systems are more flexible and include insulation layers, so they require a different approach than traditional stucco repair. When repairing EIFS:
- Remove loose material with the right tools.
- Repair the foam insulation if necessary.
- Use the correct stucco application method for synthetic materials.
Never use standard cement products on EIFS—they’re too rigid and can create new cracks. If the damage is extensive, professional stucco repair may be the safest option to avoid trapping moisture inside the wall system.
Step 6: Preventing Moisture Problems
Moisture is one of the most common causes of cracks and stucco issues. After completing a repair, sealing the repaired area is crucial to protect it from future problems.
Moisture prevention tips:
- Fix drainage problems around your home’s exterior.
- Look for gaps in windows or door frames.
- Seal any patch after it dries.
- Check for water damage on nearby walls.
- Avoid painting before the surface is fully cured.
A good seal helps protect the stucco from rain, humidity, and more extreme weather.
Step 7: When to Call a Professional
Many homeowners can handle minor crack repairs, but deep cracks, spreading fractures, or cracks connected to structural movement require expert attention. Professional crews have the right tools, materials, and experience to create a durable bond and ensure the repair blends well with the surrounding stucco. When cracks expand or return repeatedly, it’s often a sign that professional stucco repair is necessary.
Call a pro if:
- Cracks run across multiple areas
- The wall feels soft or hollow
- You notice large gaps or missing layers
- There’s recurring discoloration or moisture return
- You see cracks on the entire wall
Professionals can also determine whether the problem involves synthetic stucco, traditional stucco, or deeper foundation movement.
Step 8: Maintain Your Stucco to Prevent Future Cracks
Regular maintenance helps prevent larger repairs later. By giving your stucco regular attention, you can avoid costly damage and keep your exterior looking clean. Consistent care reduces the chance of needing major stucco repair in the future.
Maintenance tips:
- Inspect walls after storms
- Keep irrigation away from exterior surfaces
- Fix minor issues quickly
- Clean debris with a brush
- Seal cracks before moisture spreads
- Touch up paint as needed
Preventive care extends the life of your stucco and reduces long-term repair costs.
Protect Your Home With Expert Stucco Care
Hardcoat stucco can last for decades when maintained correctly. Whether you’re dealing with small cracks, deeper damage, or moisture-related issues, following the right repair process helps restore strength and keep your home protected. But when the damage extends beyond the damaged area or reveals underlying structural concerns, professional help ensures a safe, seamless, and long-lasting repair.
For trusted, high-quality service and a team that understands what your home needs, contact Orlando Stucco Repair Pros today.
Frequently Asked Questions
What causes cracks to appear in hardcoat stucco?
Cracks develop from drying shrinkage, foundation movement, moisture intrusion, or Orlando’s extreme heat. Small cracks are common, but wider ones may signal deeper issues that require professional evaluation.
How do I know if stucco damage is from moisture?
Signs include bubbling paint, dark stains, peeling texture, or a musty smell after rain. Moisture-related problems spread quickly in humid climates, so early repair is important.
Can hairline cracks be repaired without replacing large sections?
Yes. Most hairline cracks only need cleaning and a thin patch to restore the surface. Larger cracks or crumbling areas may require rebuilding layers for a stronger finish.
How long do stucco repairs typically last?
With proper materials, sealing, and maintenance, repairs can last many years. Factors like weather exposure, installation quality, and local conditions influence longevity.
Should stucco be sealed after repairs?
Sealing helps prevent water intrusion and protects the surface from Orlando’s heavy rainfall and UV exposure. It is recommended to seal stucco every few years for the best results.
RECENT BLOGS